# BERT (TensorFlow2)
Bidirectional Encoder Representations from Transformers for NLP pre-training and fine-tuning tasks (SQuAD), using the [huggingface transformers library](https://huggingface.co/docs/transformers/index), optimised for Graphcore's IPU.
| Framework | Domain | Model | Datasets | Tasks | Training | Inference | Reference |
|-----------|--------|-------|----------|-------|----------|-----------|-----------|
| TensorFlow 2 | NLP | BERT | WIKI-103 | Next sentence prediction, Masked language modelling, Question/Answering | ✅
Min. 16 IPUs (POD16) required |
✅
Min. 16 IPUs (POD16) required | [BERT: Pre-training of Deep Bidirectional Transformers for Language Understanding](https://arxiv.org/abs/1810.04805v2) |
This directory demonstrates how to run the natural language model BERT (https://arxiv.org/pdf/1810.04805.pdf) on Graphcore IPUs utilising the [huggingface transformers library](https://huggingface.co/docs/transformers/index).
There are two examples:
1. BERT for pre-training on masked Wikipedia data - `run_pretraining.py`
2. BERT for SQuAD (Stanford Question Answering Dataset) fine-tuning - `run_squad.py`
The BERT model in these examples is taken from the Huggingface transformers library and is converted into an IPU optimised format.
This includes dynamically replacing layers of the model with their IPU specific counterparts, outlining repeated blocks of the model, recomputation, and pipelining the model to efficiently over several Graphcore IPUs.
The pretraining implementation of BERT uses the LAMB optimiser to capitalise on a large batch-size of 65k sequences in pre-training, and the SQuAD fine-tuning demonstrates converting a pre-existing Huggingface checkpoint.
## Instructions summary
1. Install and enable the Poplar SDK (see Poplar SDK setup)
2. Install the system and Python requirements (see Environment setup)
3. Download the WIKI-103 dataset (See Dataset setup)
## Poplar SDK setup
To check if your Poplar SDK has already been enabled, run:
```bash
echo $POPLAR_SDK_ENABLED
```
If no path is provided, then follow these steps:
1. Navigate to your Poplar SDK root directory
2. Enable the Poplar SDK with:
```bash
cd poplar---
. enable.sh
```
## Environment setup
To prepare your environment, follow these steps:
1. Create and activate a Python3 virtual environment:
```bash
python3 -m venv
source /bin/activate
```
2. Navigate to the Poplar SDK root directory
3. Install the TensorFlow 2 and IPU TensorFlow add-ons wheels:
```bash
cd
pip3 install tensorflow-2.X.X......x86_64.whl
pip3 install ipu_tensorflow_addons-2.X.X...any.whl
```
For the CPU architecture you are running on
4. Install the Keras wheel:
```bash
pip3 install --force-reinstall --no-deps keras-2.X.X...any.whl
```
For further information on Keras on the IPU, see the [documentation](https://docs.graphcore.ai/projects/tensorflow-user-guide/en/latest/keras/keras.html#keras-with-ipus) and the [tutorial](https://github.com/graphcore/examples/tree/master/tutorials/tutorials/tensorflow2/keras).
5. Navigate to this example's root directory
6. Install the Python requirements with:
```bash
pip3 install -r requirements.txt
```
More detailed instructions on setting up your TensorFlow 2 environment are available in the [TensorFlow 2 quick start guide](https://docs.graphcore.ai/projects/tensorflow2-quick-start).
## Dataset setup
The dataset used for pretraining is WIKI-103. It can be generated from a RAW dump of Wikipedia following a five step process.
Disk space required: 143GB - Sequence length 128 (Variable), 203GB - Sequence length 512 (Variable)
```bash
.
├── wiki_000.index
├── wiki_000.tfrecord
.
.
.
├── wiki_xxx.index
└── wiki_xxx.tfrecord
0 directories, XXXX files
```
### 1. Download
Use the `wikipedia_download.sh` script to download the latest Wikipedia dump, about 20GB in size.
```bash
./data/wikipedia_download.sh
```
Dumps are available from (and mirrors) and are licensed under CC BY-SA 3.0 and GNU Free Documentation Licenses.
### 2. Extraction
In order to create the pre-training data we need to extract the Wikipedia dump and put it in this form:
```text
Title of article 1
Body of article 1
Title of article 2
Body of article 2
```
and so on.
One of the tools that can be used to do so is WikiExtractor, .
Install the WikiExtractor package with:
```bash
pip3 install wikiextractor
```
In order not to encounter a `UnicodeEncodeError` at this step, you may want to run these two commands first:
```bash
export PYTHONIOENCODING=utf-8
export LC_ALL=C.UTF-8
```
You can then use the the `wikipedia_extract.sh` script to use WikiExtractor to extract the data dump.
```bash
./data/wikipedia_extract.sh /wikidump.xml
```
The result should be a folder containing directories named `AA`, `AB`, ...
Note that the number of directories depends on the parameters of the `wikipedia_extract.sh` script, and is not to be confused with alphabetical ordering of the wikipedia articles.
In other words you should probably not expect all of `AC`, `AD`, ... `ZX`, `ZY`, `ZZ` to be created by the script.
### 3. Pre-processing
Install nltk package with:
```bash
pip3 install nltk
```
Use the `wikipedia_preprocess.py` script to preprocess the extracted files.
```bash
python3 ./data/wikipedia_preprocess.py --input-file-path --output-file-path
```
### 4. Tokenization
The script `create_pretraining_data.py` can accept a glob of input files to tokenize.
However, attempting to process them all at once may result in the process being killed by the OS for consuming too much memory.
It is therefore preferable to convert the files in groups. This is handled by the `./data/wikipedia_tokenize.py` script.
At the same time, it is worth bearing in mind that `create_pretraining_data.py` shuffles the training instances across the loaded group of files, so a larger group would result in better shuffling of the samples seen by BERT during pre-training.
The tokenization depends on `tensorflow` which can be installed by:
```bash
pip3 install tensorflow
```
sequence length 128
```bash
python3 ./data/wikipedia_tokenize.py --sequence-length 128 --mask-tokens 20
```
sequence length 512
```bash
python3 ./data/wikipedia_tokenize.py --sequence-length 512 --mask-tokens 76
```
### 5. Indexing
In order to use the multi-threaded `dataloader`, `tfrecord` index files need to be generated.
First install the `tfrecord` Python package into your Python environment:
```bash
pip3 install tfrecord
```
Then go to the directory containing the pre-processed Wikipedia files and run:
```bash
for f in *.tfrecord; do python3 -m tfrecord.tools.tfrecord2idx $f `basename $f .tfrecord`.index; done
```
**3) (Optional) Download Huggingface checkpoint**
To quickly run finetuning you can download a pre-trained model from the Huggingface [repository](https://huggingface.co/models) and run finetuning.
The path to this checkpoint can be given in the command-line for `run_squad.py --pretrained-ckpt-path `.
## Running and benchmarking
To run a tested and optimised configuration and to reproduce the performance shown on our [performance results page](https://www.graphcore.ai/performance-results), please follow the setup instructions in this README to setup the environment, and then use the `examples_utils` module (installed automatically as part of the environment setup) to run one or more benchmarks. For example:
```bash
python3 -m examples_utils benchmark --spec
```
Or to run a specific benchmark in the `benchmarks.yml` file provided:
```bash
python3 -m examples_utils benchmark --spec --benchmark
```
For more information on using the examples-utils benchmarking module, please refer to [the README](https://github.com/graphcore/examples-utils/blob/master/examples_utils/benchmarks/README.md).
## Custom training
### Pre-training with BERT on IPU
To validate that the machine and repository are set up correctly the BERT tiny model and sample text can be used.
The `tests/pretrain_tiny_test.json` file is a small model that can be used for simple experiments. Note that if you don't specify the directory where the sample text file is stored, this will default to using the whole wikipedia dataset.
```bash
python run_pretraining.py --config tests/pretrain_tiny_test.json --dataset-dir data_utils/wikipedia/
```
### Run Pre-Training Phase 2
Phase 2 of pre-training is done using a sequence length of 384 with the masked Wikipedia dataset, this second phase is run using the same `run_pretraining.py` script as for phase 1.
To run pre-training phase 2 starting from a phase 1 checkpoint for BERT Base use the following command:
```bash
python3 run_pretraining.py --config configs/pretrain_base_384_phase2.json --pretrained-ckpt-path
```
### Fine-Tuning BERT for Question Answering with SQuAD 1.1
Provided are the scripts to fine-tune BERT on the Stanford Question Answering Dataset (SQuAD 1.1), a popular question answering benchmark dataset. In version 1.1 there are no unanswerable questions.
To run on SQuAD, you will first need to download the dataset. The necessary training data can be found at the following link:
[train-v1.1.json](https://rajpurkar.github.io/SQuAD-explorer/dataset/train-v1.1.json)
Place the data in a directory `squad/` parallel to the Wikipedia data, the expected path can be found in the `configs/squad_base.json` file.
To run BERT fine-tuning on SQuAD requires the same set-up as for pre-training, follow the steps in [Prepare Environment](#prep_env) to activate the SDK and install the required packages.
The fine-tuning for a Large model on SQuAD 1.1 can be run with the following command:
``` bash
python3 run_squad.py configs/squad_base.json
```
After fine-tuning the predictions file will be generated and the results evaluated.
You should expect to see results for BERT Base approximately as:
`{"f1": 87.97, "exact_match": 80.60}`.
## Other features
### View the pre-training results in Weights & Biases
This project supports Weights & Biases, a platform to keep track of machine learning experiments. A client for Weights&Biases will be installed by default and can be used during training bypassing the `--wandb` flag.
The user will need to manually login (see the quickstart guide [here](https://docs.wandb.ai/quickstart) and configure the project name with `--wandb-name`.)
For more information please see https://www.wandb.com/.
Once logged into wandb logging can be activated by toggling the `log_to_wandb` option in the config file.
You can also name your wandb run with the flag `--name `.
### Run Pre-Training Phase 1
Pre-Training BERT Phase 1 uses sequence length 128, and uses masked Wikipedia data to learn word and position embeddings - task specific performance is later tuned with finetuning.
This can be thought of as training the body of the model while the finetuning provides performance for specific heads.
The pre-training is managed by the `run_pretraining.py` script and the model configuration by the config files in `configs/`.
Provided configs are for `BASE` and `LARGE`, tuned to run on a Graphcore IPU POD system with 16 IPUs.
To run pre-training for BERT Base use the following command:
```bash
python3 run_pretraining.py --config configs/pretrain_base_128_phase1.json
```
Swapping the config for `pretrain_large_128.phase1.json` will train the BERT Large model.
The path to the dataset is specified in the config, so ensure the path is correct for your machine, or give the path directly in the command-line with `--dataset-dir /localdata/datasets/wikipedia/128/`.
The results of this run can be logged to Weights and Biases.
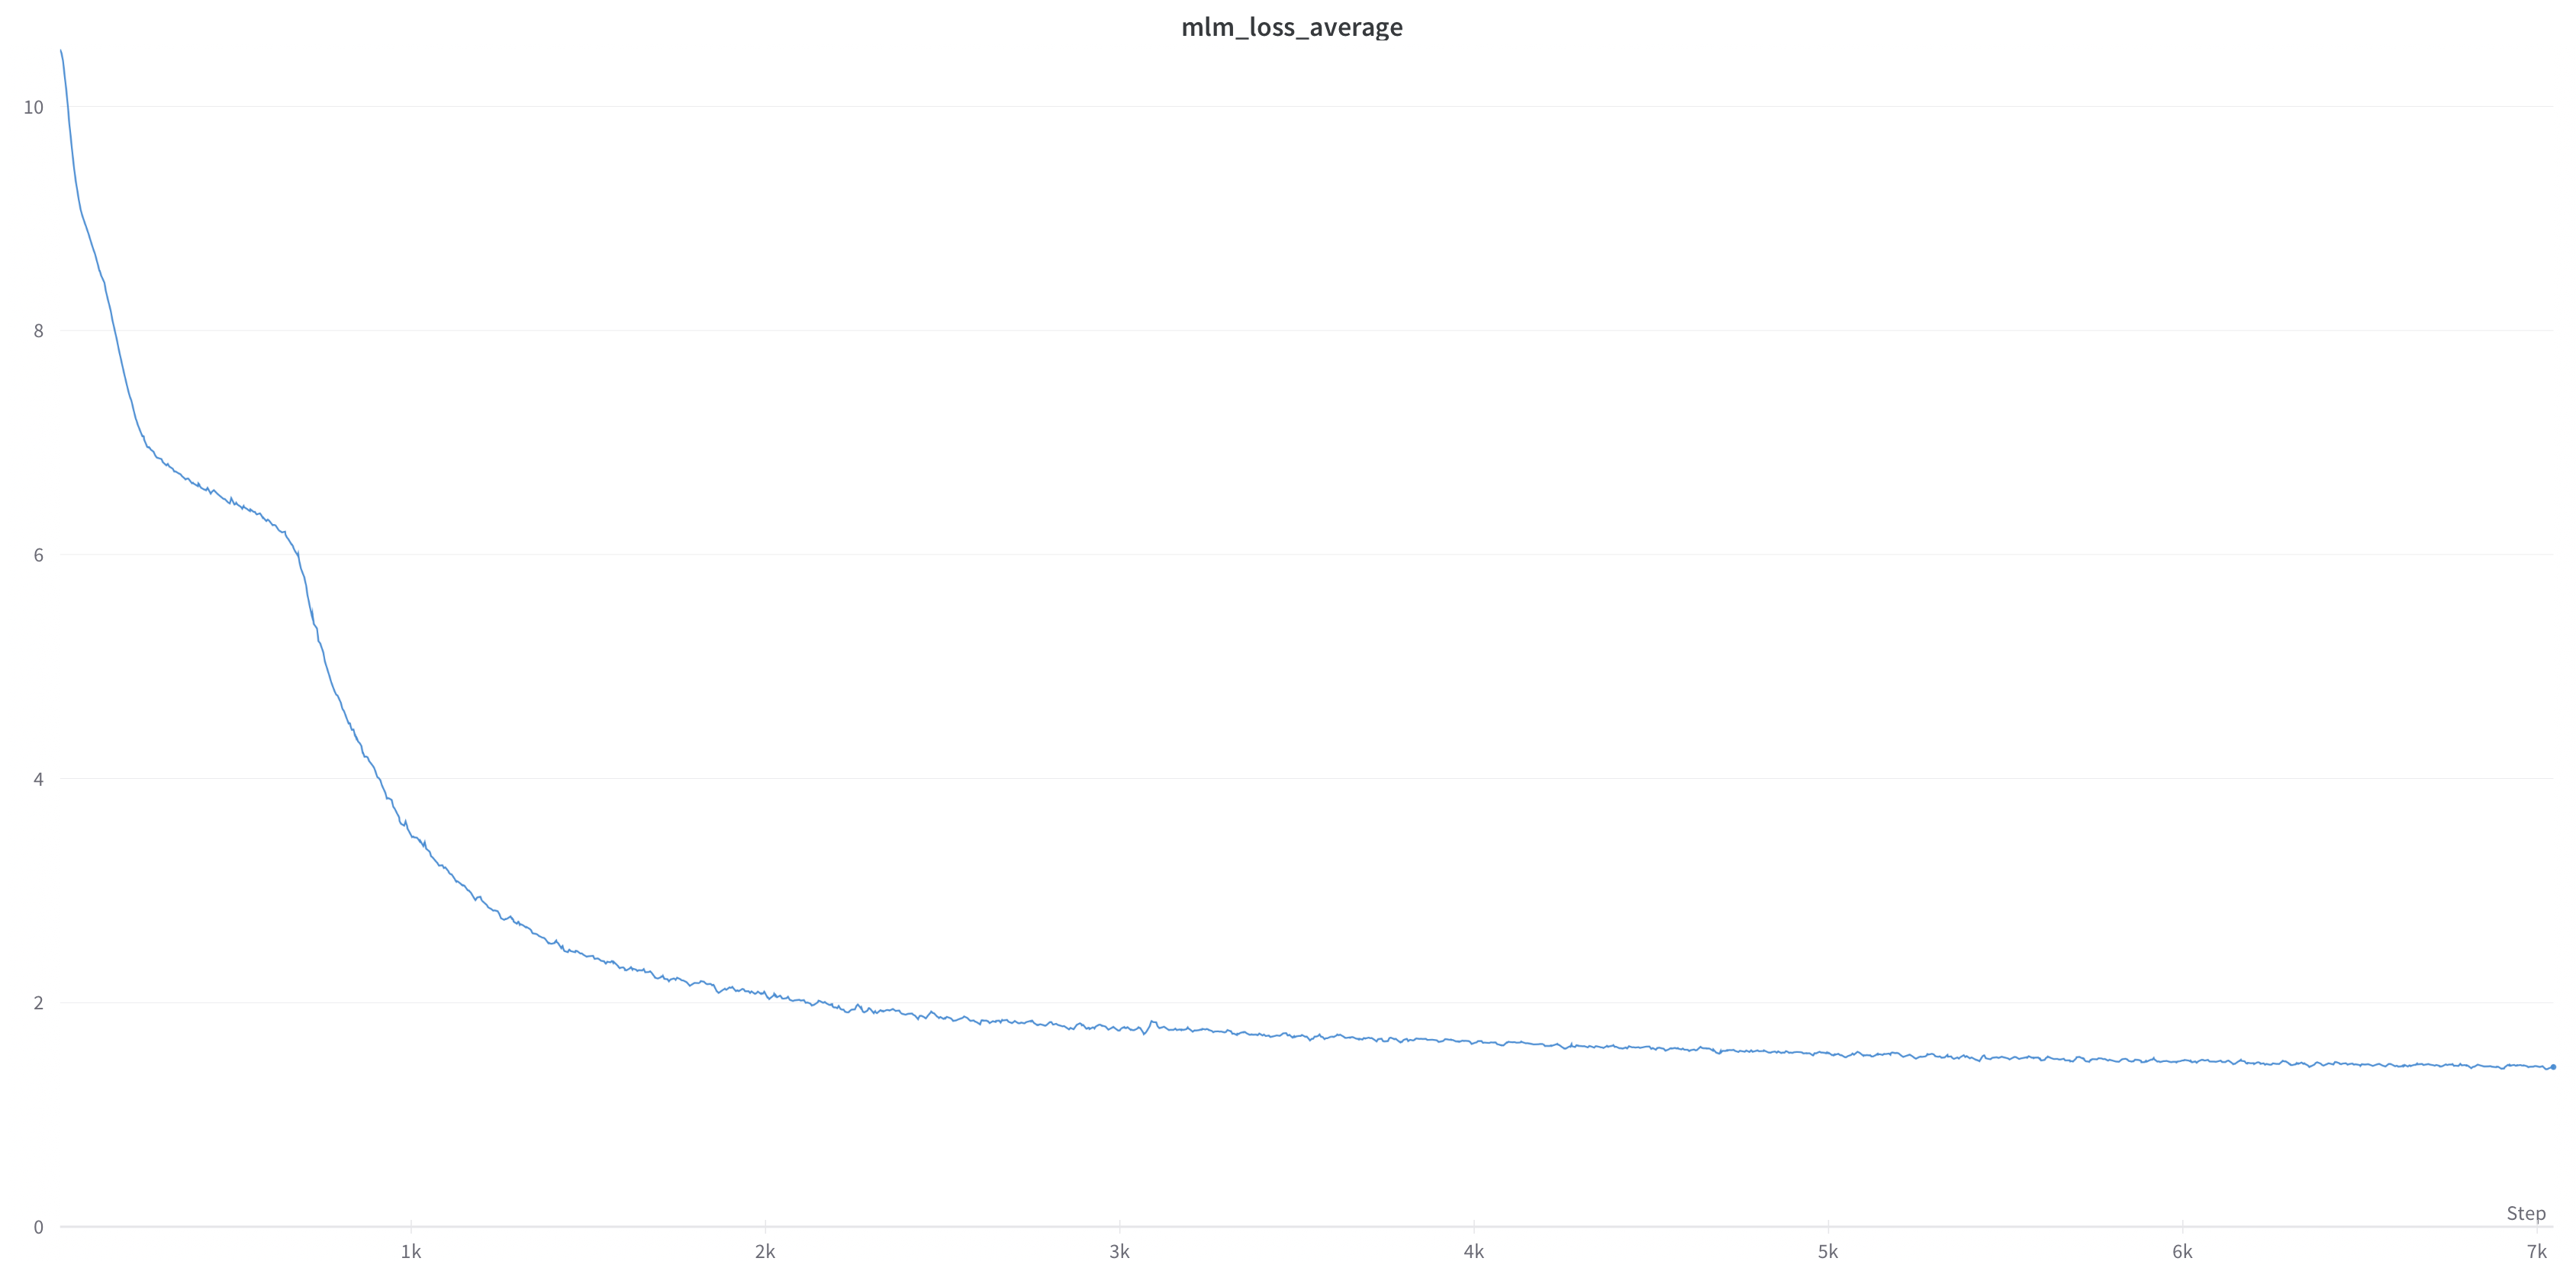
The resulting MLM loss curve will look like the following figure. You should see the double descent, characteristic of BERT pre-training, over the first 2000 steps before the loss plateaus to a value of approximately `1.4`. The exact result will vary depending on the Wikipedia dump and stochasticity.
 ### Detailed overview of the config file format
The config files are how the bulk of the interaction with the model is conducted. These config files have two sections; firstly parameters that describe the model architecture (hidden layer size, number of attention heads, etc.) and differentiate between different BERT models; secondly, the parameters that describe the optimisation of the model for the IPU are given (such as batch size, loss scaling, outlining, and the pipeline configuration.)
To see the available configurations for both SQuAD and pre-training see the `JSON` files in the `config/` directory, and
To see the available options available to use in the command line interface use the `--help` argument:
```console
python3 run_pretraining.py --help
# or
python3 run_squad.py --help
```
For advanced users wanting to customise the models, you may wish to update the config.
Key parameters to consider if customising the model are:
* `replicas` - the number of times to replicate the model, e.g., for a 4 IPU pipeline, 4x replication will use all 16
IPUs on an IPU-POD 16. Replicating a model is known as _data parallelism_, since each replica process a part of the
batch of samples. We call _micro batch_, the number of samples processed by each replica at a time, so they have to
fit in memory during the forward and backward passes; and we call _global batch_ the total number of samples used
to estimate the gradient, which can include multiple micro batches per replica.
* `micro_batch_size` - the size of the micro-batch that is seen by each replica
* `grad_acc_steps_per_replica` - the number of micro-batches that are accumulated on each replica before performing the
gradient update.
* `global batch size` - this is not a direct parameter in the config file, but is derived from the product:
`global_batch_size = micro_batch_size * replicas * grad_acc_steps_per_replica`. In other words, this is the total
number of samples used to compute the single gradient update step. By accumulating over multiple micro batches and
over multiple replicas, we can use very large batch sizes, even if they don't fit in memory, which has been proved
to speed up training (see, e.g., https://arxiv.org/pdf/1904.00962.pdf).
* `loss_scaling` - scaling factor used to scale the losses down to improve stability when training with large global
batch sizes and partial precision (float16) computations.
* `matmul_available_memory_proportion_per_pipeline_stage` - the available memory proportion per IPU that `Poplar`
reserves for temporary values, or intermediate sums, in operations such as matrix multiplications or convolutions.
Reducing the memory proportion, reduces the memory footprint which allows to fit a larger micro batch in memory; but
it also constraints the `Poplar` planner, which can lead to lower throughput.
* `pipeline_stages` - a nested list describing which model blocks are placed on which IPUs. The name abbreviations are
found in `model/pipeline_stage_names.py` and can be customised with different layers.
* `device_mapping` - a list mapping each of the pipeline stages onto each physical IPUs. An example of how this can be
customised can be seen in the BERT configurations where the _pooler_ layer and the heads are placed on IPU 0 with
the embeddings layer to improve performance.
### Notes for optimization approaches
In order to reach optimized performance for the BERT model, the following optimization methods have been adopted:
* The Keras precision policy was set to float16 in `run_pretraining.py`, `run_squad.py` and `run_seq_classification.py`:
```
policy = tf.keras.mixed_precision.Policy("float16")
tf.keras.mixed_precision.set_global_policy(policy)
```
Both compute and variable dtypes are set to float16. But note that the optimizer states, optimizer update and the loss functions are still in float32 for convergence purpose.
* To simulate larger batch sizes we use gradient accumulation, which accumulates gradients across multiple micro-batches together and then performs the weight update with the accumulated gradients. We use the [running mean](https://docs.graphcore.ai/projects/tensorflow-user-guide/en/latest/tensorflow/api.html?highlight=running_mean#tensorflow.python.ipu.gradient_accumulation.GradientAccumulationReductionMethod) accumulation method which performs a more stable running mean of the gradients.
* The model was pipelined over 4 IPUs. More information about pipelining can be found [here](https://docs.graphcore.ai/projects/memory-performance-optimisation/en/latest/optimising-performance.html#pipeline-execution-scheme).
* When pipelining, place the heads on the same IPU with the embeddings (typically IPU0) so that the weights for embeddings can be shared.
For example, for BERT large in the config file:
```
"pipeline_stages": [
["emb", "hid", "hid", "hid"],
["hid", "hid", "hid", "hid", "hid", "hid", "hid"],
["hid", "hid", "hid", "hid", "hid", "hid", "hid"],
["hid", "hid", "hid", "hid", "hid", "hid", "hid"],
["enc_out", "pool", "heads"]
],
"pipeline_device_mapping": [0, 1, 2, 3, 0]
```
The pipeline stage "emb" was placed on IPU0 along with the "heads".
* Serialised embedding matmul: in `utilities/options.py`
```
embedding_serialization_factor: int = 2
```
The embedding matmul is serialized with the same factor as the matmul used in the IpuTFBertLMPredictionHead class in `model/ipu_lm_prediction_head.py` as it's a tied embedding. The ipu specific math operation `serialized_matmul` is used.
* Compute the MLM loss for the masked tokens only instead of over all tokens, as the calculation of loss on full sequence length requires more memory. This is done in `model/ipu_pretraining_model.py`. The number of masked tokens should be fixed and specified in the config files:
```
"max_predictions_per_seq": 20
```
for phase 1 and
```
"max_predictions_per_seq": 56
```
for phase 2.
* Enable recomputation with checkpoints after each hidden layer. This will limit significantly the amount of not-always-live memory required.
The recompuation checkpoint is added with the class
```
ModelAddRecomputationCheckpoints
```
in `keras_extentions/model_transformations.py`. More information about [recomputation checkpoint](https://docs.graphcore.ai/projects/memory-performance-optimisation/en/latest/common-memory-optimisations.html#recomputation-checkpoints).
* Offload the optimiser state. Guide can be found [here](https://docs.graphcore.ai/projects/memory-performance-optimisation/en/latest/common-memory-optimisations.html#variable-offloading).
* Replace the upstream GeLu activation with the IPU specific GeLu when calling the bert_config in `run_pretraining.py`, `run_squad.py` and `run_seq_classification.py`.
```
bert_config = BertConfig(**config.bert_config.dict(), hidden_act=ipu.nn_ops.gelu)
```
* Replace upstream Dropout and LayerNorm layers with the IPU specific versions.
In `model/convert_bert_mode.py`:
```
{Dropout: {"new_class": IpuDropoutCustom}},
{LayerNormalization: {
"new_class": IpuLayerNormalization,
"copy_weights": True
}
```
### Detailed overview of the config file format
The config files are how the bulk of the interaction with the model is conducted. These config files have two sections; firstly parameters that describe the model architecture (hidden layer size, number of attention heads, etc.) and differentiate between different BERT models; secondly, the parameters that describe the optimisation of the model for the IPU are given (such as batch size, loss scaling, outlining, and the pipeline configuration.)
To see the available configurations for both SQuAD and pre-training see the `JSON` files in the `config/` directory, and
To see the available options available to use in the command line interface use the `--help` argument:
```console
python3 run_pretraining.py --help
# or
python3 run_squad.py --help
```
For advanced users wanting to customise the models, you may wish to update the config.
Key parameters to consider if customising the model are:
* `replicas` - the number of times to replicate the model, e.g., for a 4 IPU pipeline, 4x replication will use all 16
IPUs on an IPU-POD 16. Replicating a model is known as _data parallelism_, since each replica process a part of the
batch of samples. We call _micro batch_, the number of samples processed by each replica at a time, so they have to
fit in memory during the forward and backward passes; and we call _global batch_ the total number of samples used
to estimate the gradient, which can include multiple micro batches per replica.
* `micro_batch_size` - the size of the micro-batch that is seen by each replica
* `grad_acc_steps_per_replica` - the number of micro-batches that are accumulated on each replica before performing the
gradient update.
* `global batch size` - this is not a direct parameter in the config file, but is derived from the product:
`global_batch_size = micro_batch_size * replicas * grad_acc_steps_per_replica`. In other words, this is the total
number of samples used to compute the single gradient update step. By accumulating over multiple micro batches and
over multiple replicas, we can use very large batch sizes, even if they don't fit in memory, which has been proved
to speed up training (see, e.g., https://arxiv.org/pdf/1904.00962.pdf).
* `loss_scaling` - scaling factor used to scale the losses down to improve stability when training with large global
batch sizes and partial precision (float16) computations.
* `matmul_available_memory_proportion_per_pipeline_stage` - the available memory proportion per IPU that `Poplar`
reserves for temporary values, or intermediate sums, in operations such as matrix multiplications or convolutions.
Reducing the memory proportion, reduces the memory footprint which allows to fit a larger micro batch in memory; but
it also constraints the `Poplar` planner, which can lead to lower throughput.
* `pipeline_stages` - a nested list describing which model blocks are placed on which IPUs. The name abbreviations are
found in `model/pipeline_stage_names.py` and can be customised with different layers.
* `device_mapping` - a list mapping each of the pipeline stages onto each physical IPUs. An example of how this can be
customised can be seen in the BERT configurations where the _pooler_ layer and the heads are placed on IPU 0 with
the embeddings layer to improve performance.
### Notes for optimization approaches
In order to reach optimized performance for the BERT model, the following optimization methods have been adopted:
* The Keras precision policy was set to float16 in `run_pretraining.py`, `run_squad.py` and `run_seq_classification.py`:
```
policy = tf.keras.mixed_precision.Policy("float16")
tf.keras.mixed_precision.set_global_policy(policy)
```
Both compute and variable dtypes are set to float16. But note that the optimizer states, optimizer update and the loss functions are still in float32 for convergence purpose.
* To simulate larger batch sizes we use gradient accumulation, which accumulates gradients across multiple micro-batches together and then performs the weight update with the accumulated gradients. We use the [running mean](https://docs.graphcore.ai/projects/tensorflow-user-guide/en/latest/tensorflow/api.html?highlight=running_mean#tensorflow.python.ipu.gradient_accumulation.GradientAccumulationReductionMethod) accumulation method which performs a more stable running mean of the gradients.
* The model was pipelined over 4 IPUs. More information about pipelining can be found [here](https://docs.graphcore.ai/projects/memory-performance-optimisation/en/latest/optimising-performance.html#pipeline-execution-scheme).
* When pipelining, place the heads on the same IPU with the embeddings (typically IPU0) so that the weights for embeddings can be shared.
For example, for BERT large in the config file:
```
"pipeline_stages": [
["emb", "hid", "hid", "hid"],
["hid", "hid", "hid", "hid", "hid", "hid", "hid"],
["hid", "hid", "hid", "hid", "hid", "hid", "hid"],
["hid", "hid", "hid", "hid", "hid", "hid", "hid"],
["enc_out", "pool", "heads"]
],
"pipeline_device_mapping": [0, 1, 2, 3, 0]
```
The pipeline stage "emb" was placed on IPU0 along with the "heads".
* Serialised embedding matmul: in `utilities/options.py`
```
embedding_serialization_factor: int = 2
```
The embedding matmul is serialized with the same factor as the matmul used in the IpuTFBertLMPredictionHead class in `model/ipu_lm_prediction_head.py` as it's a tied embedding. The ipu specific math operation `serialized_matmul` is used.
* Compute the MLM loss for the masked tokens only instead of over all tokens, as the calculation of loss on full sequence length requires more memory. This is done in `model/ipu_pretraining_model.py`. The number of masked tokens should be fixed and specified in the config files:
```
"max_predictions_per_seq": 20
```
for phase 1 and
```
"max_predictions_per_seq": 56
```
for phase 2.
* Enable recomputation with checkpoints after each hidden layer. This will limit significantly the amount of not-always-live memory required.
The recompuation checkpoint is added with the class
```
ModelAddRecomputationCheckpoints
```
in `keras_extentions/model_transformations.py`. More information about [recomputation checkpoint](https://docs.graphcore.ai/projects/memory-performance-optimisation/en/latest/common-memory-optimisations.html#recomputation-checkpoints).
* Offload the optimiser state. Guide can be found [here](https://docs.graphcore.ai/projects/memory-performance-optimisation/en/latest/common-memory-optimisations.html#variable-offloading).
* Replace the upstream GeLu activation with the IPU specific GeLu when calling the bert_config in `run_pretraining.py`, `run_squad.py` and `run_seq_classification.py`.
```
bert_config = BertConfig(**config.bert_config.dict(), hidden_act=ipu.nn_ops.gelu)
```
* Replace upstream Dropout and LayerNorm layers with the IPU specific versions.
In `model/convert_bert_mode.py`:
```
{Dropout: {"new_class": IpuDropoutCustom}},
{LayerNormalization: {
"new_class": IpuLayerNormalization,
"copy_weights": True
}
```